Search This Blog

Wednesday, November 11, 2015

Candy Corn Craft

Pinspiration:  31 Days of October Crafts

This one was more fun to prep than to create, but the kids had a great time.  Ripping the paper was the best activity for my creative 2 year old.  Letting the kids prep the craft was the best idea.  This is definitely a craft to keep kids busy while you cook.  As you can see, the gluing of the paper pieces was not very exciting for my dd.


Until Next Time, 

Happy Halloween!

Tuesday, November 10, 2015

Spooky Ghost Craft

Pinspiration:  31 Days of Halloween

Halloween is my second favorite holiday to decorate for.  However, since our house is under construction, I don't feel very motivated to decorate.  The kiddos had a different idea.  For the first time, both kids were excited for Halloween.  (I mean who wouldn't be excited to dress up as Batman or Elsa?)

I decided to finally put some of my pins to good use and we spend the entire week making Halloween themed crafts.  This also calmed the kiddos down, they were so excited they literally couldn't control themselves.  Do check out the pin that inspired this project.  She has several great ideas, one being the chocolate bones that we made for our Halloween Party.  This one did not take as long as others we had done this week, but I think they turned out the best.  I even had to join in on this project.


Sorry for the sideways image.  I'm still learning how to drive this blog.


Until Next Time,
Happy Halloween!

Sunday, November 8, 2015

Kids Halloween Party

Pinspriation:  Halloween Party Board

In a last minute decision, we decided that despite our renovations, we wanted to throw a Halloween Party.  How awesome was it that Halloween fell on a Saturday?!?  To make things better, we had perfect weather!  This party was so much fun to host, we have decided to make this a tradition.

Here's what we ended up doing:

Food


The possibilities for one bag of Oreo is AMAZING!

Cutting the cheese (Haha, OK, are we ready to move on?) was very easy.  My husband suggested that I stack a few pieces of cheese then cut with the cookie cutters.  This worked very well.
This added the perfect Halloween touch to our chili bar.

The kids had these for breakfast.  I could not find fake teeth, but candy corn worked pretty well.

The kids at the party LOVED these mummy hot dogs.

This was so simple and tasted great!  Kids and adults loved the almond bark covered bones. (bones made with two mini marshmallows and a pretzel stick)

Cookie decorating station.  I thought I got a close up of the witches brooms (string cheese on a pretzel stick), but I did not.  However, I will be making them again next year so be sure to stop back after next Halloween.
We also have a bowl of candy corn and candy pumpkins for a little STEM building activity with toothpicks, but no one wanted to partake.

The pumpkin dip was amazing!  I will be making it again for Thanksgiving.

Of course the kiddos loved the dirt and worms.

Activities

I made a pumpkin bowling station from painted cans, but I must have forgotten to take a picture.  It was adorable, but not a fan favorite.

I have to admit, I had my doubts about how well the spider races would work, but they worked very well!  This was a favorite for the preschool aged boys.

All of the kids enjoyed the pumpkin decorating station.  We got these fabulous tiny pumpkins from Walmart.  I put out markers and stickers.  We currently have these pumpkins decorating our ever changing front garden.  Currently it is the "Pumpkin Patch Garden".  Keep reading to see our "Spooky Garden" or as Lainey calls it, our "Pookie Garden".

My kids enjoyed this activity before the party, but it was not a huge hit with our guests.
I put out Play Dough and some eyes, pompoms, and fuzzy sticks to make monsters.


All of the kids enjoyed our spooky obstacle course.  We put a 2x4 down for a balance beam through spider alley, and hung bats and ghosts in our ball pit/indoor maze.  I also threw a few spiders in the ball pit as well.  The shrieks and giggles that came out of the maze was my favorite part of this activity.


This was another activity that did not get much use during the party.  However, we enjoyed playing tic-tac-toe afterwards and the next day.  My favorite part of this activity is that it did not have to come down with the Halloween decorations.  We just replaced the pieces with two different colored pumpkin scatters and voila, we have a Thanksgiving themed tic-tac-toe board.

Decor

We tried the spooky glowing eyes.  This did not work as well as the pin suggests.  Perhaps the front of our house was too well lit for the trick-or-treaters, or our glow sticks were not bright enough.  I will give it another shot next year and give it up if it is another flop.


We transformed the Music Garden into a Spooky Garden for the Trick-or-Treaters.  The kids LOVED decorating.  Since we were out collecting candy during the Trick-or-Treat hours, we left our candy/toy/dog treat bowls on the metal bucket.

Our front porch with blue pumpkin, to indicate we had non-edible treats for our friends with food allergies, and milk jug ghosts.  Again, I think we will need stronger glow sticks, stragegic placement in a dark area of the yard, or a darker front porch to give the full effect.

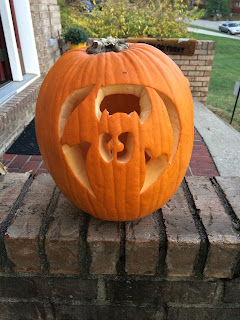
Our pumpkin carved from a stencil.

These mice on the steps got the most decoration compliments from our guests, old and young.

Until next time, 
Happy Halloween!


Wednesday, October 14, 2015

Static Electricity

Pinspiration:  STEM Bored Jar

I've pinned this one before, but we have since used more ideas from this post.  The author claims to have 48 STEM activities to prepare in 5 minutes or less.  This is true... as long as you have the materials on hand.  Most of the items can be found on hand, if you are remotely crafty, but really, you need to plan ahead if you want to be able to make good on any activity they pull out of the jar.

The kids really enjoyed putting the butterfly together, and using the balloon to make him fly.  (It did work!) However, this activity only occupied my kiddos for about 2 minutes.  If you really want to give your kids something to occupy their time with a rich learning activity while you cook dinner, you will need to find a different activity.


Happy STEAMing!

Wednesday, October 7, 2015

Pipe (Cleaner) Dreams

Pinspiration:  33 Cheep but Brilliant Ways to Keep Your Kids Busy

Who remembers that Gameboy Game?  No one?  Ok then, let's get to the main event.

This pin actually has a lot of easy to set up activities.  Don't be surprised if you see this one again.

I don't know about you, but my kids need my attention the most while I am cooking dinner.  Luckily, I have all the needed materials on hand, pipe cleaners and a colander.  Over the last two days, this has kept Lainey busy for hours.  Jake has even joined in the fun creating "patches" that are actually quite cool!


Lainey's Design

Jake's Design

What About that Base?

Pinspiration:  Building Block Fun

Jake has become quite the master builder (Who out there in blogville has seen The Lego Movie?).  He plays with Legos ALL DAY!  When he is not playing with Legos, he's talking about his next "structure".

Lainey has also become quite interested in Legos lately as well, which is awesome and terrible at the same time.  Jake is a great sharer, but Lainey can be a tornado around Lego creations.  Luckily, I found a great deal on a Lego Education Brick Set on Amazon and, voila!  No more arguments.  Each child has his/her own set of Legos and everyone is happy, right?  Not exactly, the Lego set we purchased did not come with Lego men...  No worries, I found another great deal on Lego men on Amazon. (Who doesn't love Amazon?) Three days later, we had 30 brand new Lego men.  No child needs to be given that many Lego men, and can you imagine the tears we would get if one child got 30 new toys while the other got... peace, quiet, the end of Lego destruction?

So, when I found this pin, I had to give it a shot.  We decided that each time we play the game each kiddo can choose a new Lego man as their game piece, and keep him.

The site has a link to the free downloadable game board.  I taped ours to a piece of cardboard in hopes that we can keep it longer.  I will, however, be making a slight adjustment.  The pin and paperclip spinner really does not keep well.  I have an unused clear spinner in some old school things that we will use in future game sessions.


The game was pretty fun (considering we were playing with a 2 year old who refuses to learn how to count 1, 2, 3, 4, 7, 8, 7, 8, 7, 8...).  However, if you are playing with youngsters, the game board is a bit long.  We changed the rules so that when anyone reached the finish, we would all stop and compare stacks.  This lead to an awesome discussion on measurement and comparisons.  Jake also learned to read two new words, take and lose.

I would also caution all gamers that the stacks can get quite tall and unstable and fall over constantly. (Playing with an uncoordinated 2 year old didn't help much either.)  We moved our stacks off to the side of the board and chose a different Lego piece to use as our chip on the game board.  Another option would be to build the towers off to the side and use the Lego men as your game pieces, but my kiddos loved seeing how high their little man was.

With those few adjustments, I would recommend this game for all of young master builders out there.

Wednesday, May 27, 2015

So Sweet, but don't forget the salt and pepper...

Pinspiration:  Easy Balsamic Chicken Skewers

So, the thing I love about Pinterest is that you can find a recipe for just about anything you have in your house.  The down side... it's not always a great recipe (despite the descriptions that claim you just found the "best recipe ever" or "my family begs me to make this").

I can promise you that this is not that recipe.  Was it good?  Yes.  Was it awesome and the kids can't wait to devour it again? No.

Here's the recipe.  Don't forget the salt and pepper.  I didn't add it at first and the chicken was kind of bland.  So there you go.  It's an easy, edible recipe for a busy night.


EASY BALSAMIC CHICKEN SKEWERS

All you need are 5 ingredients (including salt and pepper!) to make these delicious easy balsamic chicken skewers. And be sure to check out our incredible giveaway at the bottom of the page.

INGREDIENTS:

  • 2 cups DeLallo balsamic vinegar
  • 1/4 cup honey
  • 2 pounds boneless, skinless chicken breasts, cut into bite-sized pieces
  • kosher salt and freshly-ground black pepper
  • wooden or metal skewers

DIRECTIONS:

Whisk together balsamic vinegar and honey until combined to form your marinade. Add the marinade and chicken pieces to a large ziplock bag or mixing bowl, and toss until combined. Seal/cover and refrigerate to marinate for at least 10 minutes, or up to 8 hours. Also, if you are using wooden skewers, set them to soak in a pan of water for at least 10 minutes so that they do not burn.
When you are ready to cook the chicken, heat a grill to medium-high heat. Remove the chicken pieces from the marinade, reserving the marinade for later, and thread chicken onto skewers. Season the skewers generously with salt and pepper. Place on a grill that has been lightly greased with cooking spray. Cook the chicken skewers for 3-4 minutes per side, turning once, until the chicken is no longer pink inside and cooked through. Remove chicken skewers from grill and place on a serving plate.
Meanwhile or after, pour the reserved marinade into a small saucepan and bring to a boil over high heat. Reduce heat to medium-low and simmer for about 12 minutes, or until the mixture is reduced by half and is thick enough to coat the back of a spoon. (The glaze will thicken even more as it cools.) Remove from heat, and brush the glaze onto the skewers until they are all evenly coated. Serve warm.
For a shortcut, you can also marinate the chicken in 1/2 cup of DeLallo's pre-made balsamic glaze. Then once the chicken has been grilled, brush (a separate) 1/2 cup of balsamic glaze onto the cooked chicken skewers.